Upholstered Headboard with Nailhead Trim
July 2012
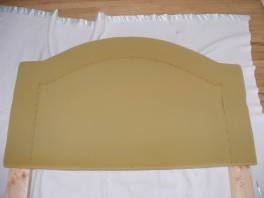
While updating my daughter’s room, we stumbled across a decorating style that she thought was right up her alley – Hollywood Regency. She loves it! It’s got clean lines and bright pops of color along with plenty of bling. What’s not to like, right? So, a common feature of a Hollywood Regency bedroom is an upholstered headboard and they happen to be so popular right now – plenty of examples to see online. At one time, many moons ago, I started to make my daughter an upholstered headboard for her room, but got stumped trying to find fabric that matched her bedding. (Who knew there were so many shades of purple?!) The shape of the headboard was good, but it had a very padded design using 2″ foam. I decided to try and reuse the headboard I originally started and see if I could remove the foam which I had previously glued to the headboard.
First I laid down an old blanket to protect the floors while I worked on the headboard. Then I removed the dacron attached to the headboard. It took a while to find all those staples.
I was able to remove the 2″ foam by using a putty knife to scrape the foam away from the plywood. It came off in one piece. (I’m wondering how I might reuse the foam on another project.)
Now on to the new look! I gathered all the supplies:
- 4-1/4 yds of 10 oz. polyester batting – I wanted the headboard to have a puffy edge between the nailheads and edge of the headboard, so I chose pretty thick batting and purchased enough for 3 layers.
- 2 yds purple velour – 58″ wide, no stretch. I started out looking for velvet, but once again finding that elusive correct shade of purple was difficult. I stumbled upon this velour which gives the rich feel I was looking for and the shade of purple worked! (It was also 50% off!) If you use apparel fabric like I did, be sure to choose one without any stretch. Otherwise your fabric will droop on the headboard.
- staple gun and staples – I found that I needed an electric staple gun to get the staples to catch in the 2x4s.
- nailhead trim kit – in nickle. I bought it at JoAnn’s and used a coupon – only $12.
- mallet
- needlenose pliers
- hearing protection (not pictured) – I couldn’t believe how loud the staple gun was in our house of wood floors and plaster walls!
- scissors (not pictured)
- ruler (not pictured)
Optional Supplies:
- Putty knife or scraper
- Wire cutters
- Metal file
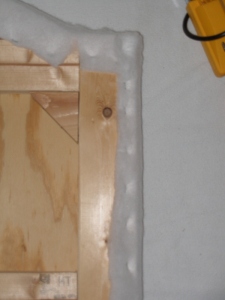
I laid the batting down on the blanket and put the headboard on top face down. Then I cut a piece of batting wide enough to wrap around the headboard with some room to staple it on the back.
Then I just stapled the batting to the back of the headboard, cutting it where necessary to provide ease around curves and folding it at corners.
I turned the headboard over and cut the bottom edge of the batting so that I would have enough to wrap under the bottom of the headboard and go around to the back to staple. Then I notched out some of that length for the legs and stapled the batting to the front at the top of the legs and turned the headboard back over to finish stapling the batting along the bottom edge. First layer of batting done!
For the remaining two layers of batting, I repeated the same process as the first layer, but I attached the last two layers at the same time, rather than doing them separately. This worked just fine since the batting was a little sticky and the layers stayed in place together. It was a little bulky, but it worked and saved some time.
Once the headboard was covered, it was time to cover the legs. The legs of this headboard stick out a little past the sides of the bed and I thought leaving them bare wood would look weird. I thought about painting the legs, but opted for staying with the padded, upholstered look. I decided to only use two layers of batting for the legs to minimize any difficulties attaching the bed frame to the legs later. I took the pieces that I had cut off earlier, placed two layers on top of each leg and stapled the layers at the top of the legs. Next, I turned the headboard over and stapled the batting onto the back of the legs. I cut the batting for the legs to be the same length as the legs. It is flush at the floor with the legs and does not wrap under the legs. I thought that putting batting under the legs would make the headboard to be too tall.
So, here’s the headboard with all the batting on.
Now, for the fabric…..Since velour has a nap, I wanted to be sure and choose which way I wanted the nap to run before I put the velour on the headboard. The purple thing at the top is the paint chip for the wall color. The fabric at the bottom is some embroidered taffeta I found at Hancock’s that I plan to make accent pillows from. Cute, huh? Can you see where I brushed the nap in different directions right down the center? I decided that I liked the darker look on the right.
 I put a safety to pin at the “top” of the fabric to remember which way the nap should go. Then I laid the fabric down on the blanket. Since I was covering a twin headboard I was able to position the fabric so the grainline of the fabric ran top to bottom and still have the entire headboard fit onto the width of the fabric.
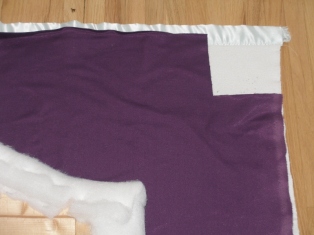
While looking at the headboard with the batting on I decided that I didn’t like that little dent at the top of the legs and I sure didn’t want that when the fabric was on. So, I thought I’d just cover the entire headboard with one piece of fabric. (Why not?, since the whole headboard fits onto the fabric, right?) Well, after some pondering, I realized that the inside corners where the legs meet the bottom of the headboard would not be covered with this new one-piece strategy. That meant I’d have to piece a little bit of fabric into each of those inside corners.
I cut a 5″ square out of each upper corner of the fabric. (I knew I’d have extra fabric there once I started folding the fabric over to the back of the headboard.) Then I stapled the 5″ square onto the back.
I turned the headboard over to the front and fit the square piece of fabric into the corner so it made a nice looking fold. Then I cut down the corner so I could lay the edges of the fabric flat on the front of the headboard. Next I just slipstitched them into place by hand so they wouldn’t shift when I was putting on the main piece of fabric.
Then it was time to attach the bulk of the fabric which I did just like I did the batting. Fold the fabric over to the back, pull the fabric tight, and staple a lot! I tried to take a lot of time on the corners. I found I had to cut out some fabric at the corners in order to get a clean look that wasn’t so bulky.
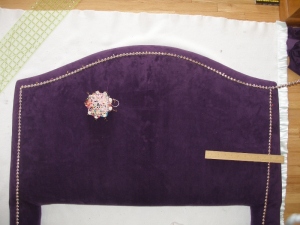
I continued wrapping around to the back and stapling the entire top of the headboard and just continued on to the legs. At the bottom of each leg, I wrapped the fabric just like wrapping a gift and stapled. Here’s the headboard with the fabric attached. It looks almost black in this photo, but looks purple in real life!
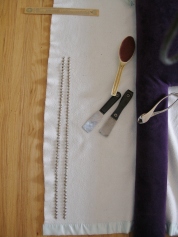
Finally, the nailhead trim which I have read so much about online! Many other bloggers talked about how sharp the trim is and cautioned against bleeding all over things. So, I went into the nailhead trim phase with some hesitation. I actually did not find the trim to be too sharp – maybe it was because I was being careful after the other reviews. I also found the trim to be flexible which I wasn’t expecting. The flexibility actually made laying out the trim a step I would recommend before nailing it down. First, I straightened the trim flat since it came coiled on a roll. Then I cut 2 lengths of trim about the length I needed for the sides. (While the trim is flexible, it won’t make a 90 degree turn at corners. I decided to use 3 strips of trim – one on each side and the top.) Then I roughly cut a length that would fit across the top and positioned it 2″ from the top edge, bending into a curve and pinning as I went.
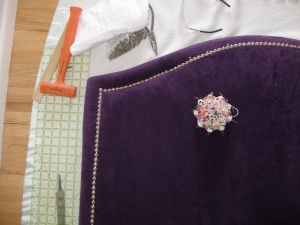
The trim has a hole to insert a tack every fifth nailhead – roughly every 2-1/2″. I wanted to be sure that the starting and stopping points of each of the 3 strips would end with a hole to nail down the trim. Otherwise I wasn’t sure how the trim would stay down at the corners. What I found after pinning the top piece of trim was that I had 2 nailheads extra at one end. (In the photo you can see that the hole by my index finger has a white pin in it and the very last hole is past the edge of the headboard.)
I figured that if I cut the top piece of trim near the hole by my index finger, I would just need to come up with 2 nailheads more to get the top length correct. If I started the side trim pieces in line with the top trim piece, that would give me the extra 2 nailheads I needed to get 2″ spacing on all sides.
Once I had the trim temporarily positioned, I cut the top piece to my desired length with wire cutters. It left a pretty sharp end that I was concerned would cut the fabric. I used a metal file to sand down the sharp edge. Then I started putting in the tacks using a mallet. Sometimes the trim would shift when nailing down the tacks, but I used a putty knife the gently lift the trim and tack, remove the tack, and do it again. As long as I corrected as I went along, it was pretty easy to do. By placing the trim 2″ from the edge I got the poofy rolled edge I was looking for.
I put a dust cover on the back to keep dust out. I used a white cotton bottom weight twill – again no stretch.
Then we attached the bed frame to the headboard. All in all, I’m pleased with the final result. It may not look Hollywood Regency now (what with monkey bedding), but it’s ready to go glam whenever my daughter is.












You are such an amazingly talented woman! I’m loving it!
Thanks for your kind words and encouragement! Great to hear from you!